I tried to assign markers for a Daz3d character imported into Blender, starting from the base of the spine, but I got an error message saying “Identical transform ‘spine_fk’ skipped”. It didn’t assign a marker to the first bone selected, which is spine_fk. The bones are named spine_fk, spine_fk.001, spine_fk.002 and so on. Any ideas why this happened?
Edit: Another question. The first marker is greyed out and I cannot set its behaviour, or its rotation limits. But in the tutorial videos, that is not the case. Did I do something wrong?
I found the explanation for the second problem, but I think it’s a bug. The bone/capsule is greyed out because its behaviour is set to Animated, which is expected. However, it cannot be selected in Shape or Limit Modes, which is why I thought its behaviour cannot be set. The only way to select it and change its behaviour is to go into Live Mode, which doesn’t make sense. I think this is a bug.
First, the identical transform message, could it be the case that the two first controls you select share position in worldspace? Do they both rotate the character from the same pivot? This is what Ragdoll is intending to look for, to help users avoid assigning infinitely small Markers inbetween two controls. But it’s possible it’s making a mistake here.
If you Ctrl + Click on the Assign button in the menu, there could be an option to disable this check. I’m not at a computer to check at the moment, but will check when I return on Monday.
Secondly, the greyed out Marker; the properties you see in your Property Panel are for the Solver itself, not the Marker. I’ve also found this, and it appears to happen when selecting the root Marker with Symmetry enabled. You can either:
Disable Symmetry (top-center button, it’s orange in your video indicating it is active)
They do not share the same position, but they indeed share the same pivot. The lowest circle, which is spine_fk, rotates only the lower body from that pivot. The circle above it, which is spine_fk.001, rotates only the upper body from the same pivot. It’s probably a Daz3d thing. In this case, do you think it’s better that I assign the markers directly to the deform bones instead of these control bones?
Edit: Actually never mind. I just tried assigning the markers to the deform bones. It doesn’t work as expected. The way Daz3d characters are structured when imported into Blender is very messy.
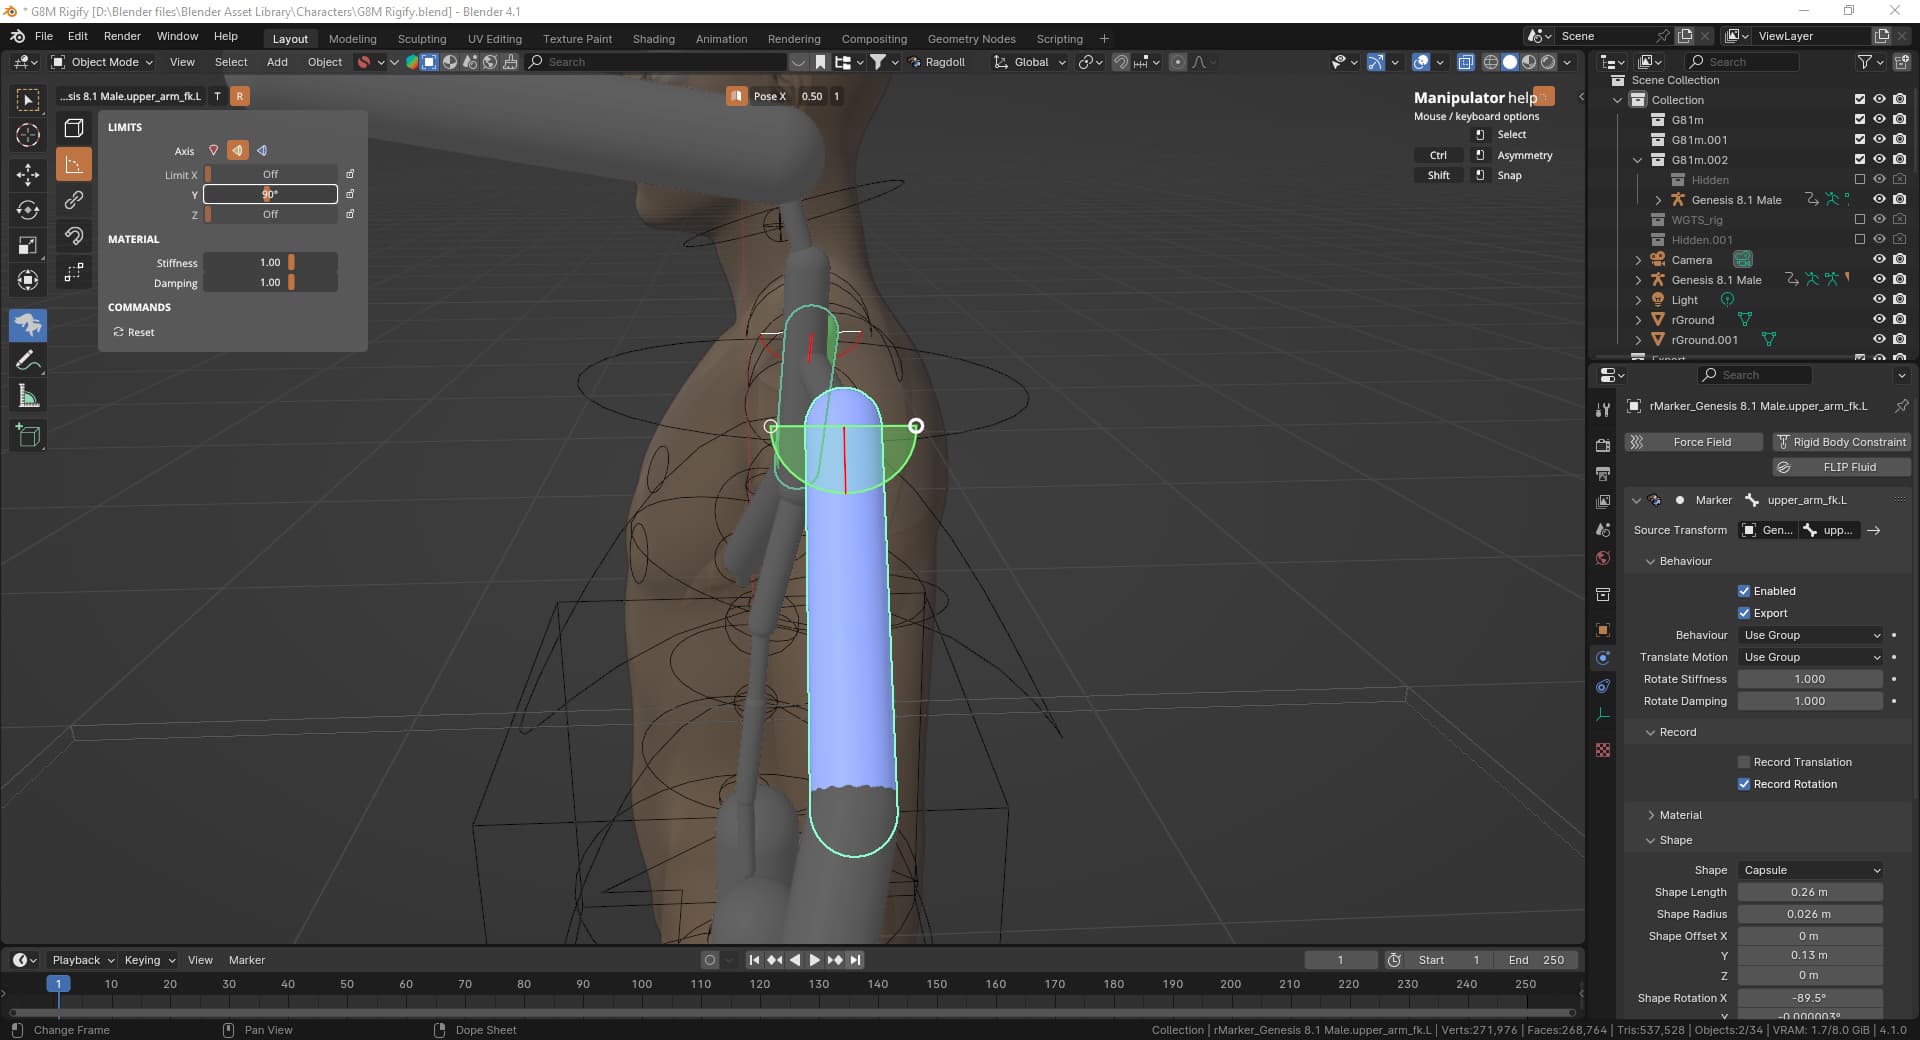
I cannot set rotation limits for the first marker of the ragdoll. In my case, the first marker corresponds to the hip bone. It should have limits when it’s used in simulation.
Marker symmetry does not work on the parameters on the right panel, but it is the only place where the marker rotations can be changed accurately. I can’t set the rotations accurately using the mouse-keyboard hotkeys. Maybe add rotations to the toggle panel in Shape Mode?
Recording simulation and toggling gravity in Live Mode give very different results. Is this normal?
Is there a button to sync symmetrical markers? It’s very easy to forget to turn on the symmetry button. But once you have made changes to one marker, it’s pretty much impossible to get them back in sync.
The IK control in Live Mode can only affect 2 markers before the marker you drag. Can I increase the number of markers that is being controlled? https://www.youtube.com/watch?v=24U4ZI1jJ_o
The Alien at 0:58, it looks like the entire tentacle was being controlled. How was that done? And then the ragdoll being dragged by the head. That was done by using “Pinch” on the head, right?
This is probably out of the scope of your software, but is it possible to control an opening like a mouth using ragdoll? If an opening is closed by default, but it is controlled by bones surrounding it, like the Alien ragdoll that comes with the addon, is it possible to push it open with ragdoll, like pushing the markers away instead of rotating them?
If I have a fight scene where a character is stabbed by a sword or an arrow, where the object is embedded in the character, like this, https://www.youtube.com/watch?v=s-qNlG77KII
I think ragdoll can’t help me in this case?
Fantastic observations, @MasterOfNone, this is what this forum is all about.
In that case, could it be the case that only one of them needs to be animated? Does rotating one not have the same effect as rotating the other?
Generally, the deform bones are the ideal candidate, as they cover all complexity of a rig to produce the final motion, which is typically what you want Markers to follow. The one reason to assign straight to animation controls is that Ragdoll also defaults to recording onto whatever you assign, so both following and recording onto the controls helps you avoid the need to retarget from deformation bones to final animation control.
Do post what you see, this should definitely work.
This is by design. What are you expecting to see from limits on the root Marker? Limits lock the range of motion of a given Marker relative another Marker. Such as the elbow only being allowed to swivel roughly 160 degrees around only 1 axis relative the upper arm. As the root has no parent, the limit would be between it and the world. Is this what you expect?
In typical Blender fashion, in order to manipulate multiple parameters in the Property Panel, you must hold the Alt key whilst pressing on the property.
I myself find this counter intuitive as well, and our Manipulator UI does not require this… But alas, this is how the Blender UI is designed.
Need an example of what you see here, I cannot spot a difference here.
Unless you mean that the gravity toggle should reproduce the effect of playing the timeline outside of Live Mode? If so, that is intentional. You can toggle the second “Tense” button to activate the Rotate Stiffness values whilst in Live Mode, but Live Mode is fundamentally different from playing back on the timeline so it will not be exact still (i.e. constraints are not active).
There is not, your best bet is to set Extents to 1, Offset and Rotation to 0 and from there resume editing symmetrically. This is generally not an issue if you edit symmetrical from the get-go, but yes. A button to resync them would be useful, it’s on the list, just a bit further down.
You will be able to, the UI lacks some nuance at the moment, but UI is the focus of the upcoming release so stay tuned for this!
Most of what drives that alien is Pin Constraints and Distance Constraints. Distance Constraints was used to bring the astronaut towards the mouth, by animating the max distance. However, today there is Attach Constraint which can achieve the same effect with more control and less effort. Live Mode was not used in that animation.
Do you mean whether you can simulate the Translation rather than just the Rotation? Not sure I understand what pushing the mouth open means, those teeth in the alien all rotate to open. But yes, you can animate position as well, by setting Translate Motion = Soft. Translation is locked per default, to emulate human limbs (which do not translate).
That seems like a clear cut case for Ragdoll, especially the first one. It almost looks like the default behaviour of assigning to a character, where the root Marker is Animated per default, and the rest of the body is gently trying to follow the animation.
If you are thinking that the sword is intersecting with the character and that Ragdoll can’t do intersections, then well (1) it’s unlikely you need to simulate the part where the intersection happens and (2) if you do, you can either disable collisions on body or sword, or you can give them the same Overlap Group such that they are allowed to intersect with each other, but nothing else.
If it were me, I’d leave both characters fully animated, until Cloud gets stabbed. Then I’d animate Behaviour from Animated to Simulated on all body parts except the one that got stabbed. Job done.
Again, excellent questions, please keep them coming!
Man, your responses are so quick that I didn’t even get to finish my questions properly
Sorry, sometimes I just type things out first so that I don’t forget them later.
The way things work for Daz3d characters imported into Blender is very weird, because each software handles rigging and posing differently. There are Original, Mechanical, Deform, Control bones. The Deform bones are constrained to the point that you can’t pose them directly. It’s one of those things where Blender just does things so differently it makes your head spin. I just try to find bones that behave similarly to FK bones, but I’ll show you what I mean by “It doesn’t work as expected.” It’s a bit funny anyway. https://youtu.be/8rBhNJhl_Wk
Well then, I think this might just be a limitation of rigging, because there has to be a root bone/marker that constrains other bones but is not constrained by other bones. But you know, the real world doesn’t work like that, which is why we can’t spin our hips 720 degrees. I think this might be why some rigs have a root bone at the base of the character that is not part of the skeleton, but I’m not sure. I’m not a professional, just someone trying to have fun.
Anyway, I’ll show you what I expected, but I totally understand if it’s not doable because I just get everything mixed together across different softwares when they work fundamentally differently. So here we start off with the first video I posted above. There are no rotation limits for these bones in Blender. You can see him twisting to the point his spine would have been broken. I can twist it further if I wanted to. That’s why I want to limit the rotation of the root marker, which is controlling the hip bones, otherwise it could twist too much.
The second part of the video shows the character in the original Daz3d software. Here, you can see how the bones are structured. There are Hip and Pelvis, but Hip in Daz3d is just a root bone that doesn’t control a specific body part. Pelvis is the one that will be the root marker in Blender. As you can see, it has rotation limits in Daz3d. In fact you can also set that in Blender, without needing a parent, which I will show in the third part of the video. https://youtu.be/QIddhfKr9Eg
Well, I will demonstrate what I mean in the other questions later. They take some time to prepare. These ones took me half a day to prepare
Again, thank you very much for the rapid response. I’m so used to waiting for months or forever for support that I pretty much gave up on contacting support.
Oh yeah, I forgot about the Alt key. Maybe add rotation to the Manipulator UI too if it’s not too much trouble? Also, I don’t know how difficult it is to implement this but, Blender allows you to translate/rotate/scale along individual axes while using mouse-keyboard in the global/local/custom etc. orientations, as well as snapping to different things. The rotation orientation in Shape Mode changes acoording to your camera perspective, right? That’s pretty difficult to use.
Yeah that did the trick.
If constraints are not active in Live Mode, if a character has an Attach Constraint to an object in his hand, does that mean I can’t pose the character in Live Mode with the object attached?
By the way, I think I found the solution to many of the problems above. You see, Blender has something called Rigify which is supposed to make posing “easier”, but as I mentioned above, it does a lot of things behind the scene that ultimately causes a lot of compatibility issues. I am so used to it that I forgot I can actually use a rig without it. A lot of “bugs” I saw seem to be gone now.
Aha, yes that is not the root control. The root should be responsible for both rotating and translating the entire character. You can still assign to this control, it’s just that it should branch off of the root.
Here, the second control I select is the root; it translates and rotates the character. That first control would then branch off of this, which would have the limits you are looking for.
If you don’t assign to the root, then Ragdoll would have no way of translating your character. So when you record, you’d find that root control without keys and a hip control that rotates the legs around.
That said, I would skip that hip control altogether, the simulation wouldn’t need it and any animation you add to it would transfer into the sim via the legs. Those kinds of extra controls only make sense when you aren’t simulating things, animator convenience.
It does yes. When you need precision you’ve got the Property Panel.
Correct, not currently possible.
Would it be possible to demonstrate how to use Rigify in such a way that is causes an issue? I haven’t used this myself.
Well, I have tried the “Translate Motion = Soft” setting, but it’s not what I’m looking for. I think it’s intended for things like rubber band?
Anyway, I think what I want isn’t that related to ragdoll, but it’s still animation with physics. I’ll show you a video.
This took a long time to set up, and it’s very inflexible, which is why I was hoping Ragdoll can help. In Blender, you can give a Shrinkwrap modifier to bones, and specify an object. The bones will always stay outside that object. Using these bones to rig an object that has a hole, you can make it look like the object is pushing that hole open. But it’s not very accurate, and you have to specify which object the bones will react to beforehand. In general it’s just very hard to set up
What I was hoping for is, instead of using this method, I assign a marker to each bone around the hole. As an object with a marker passes through, it pushes the other markers outward, giving the same effect as before. In order to do that, I have to be able to limit the translation of the markers around the hole to one axis, and no rotations at all, basically what you see in the video. Anyway, I was just exploring what kind of things Ragdoll can replace in the traditional workflow.
What… on earth are you simulating here? That’s totally doable, and translate motion is the name of the game (with an attach constraint between root and tip for a closed loop). But I cannot show it to you, because I’m trying to keep this forum kids friendly.
Ummmmmmmmmmmmmmmmmmmm, just ummmmmmmmm, making balloon dogs…
Oh wait no, it’s uh, putting clothes on. Yeah that’s it. No no, I’m very honest.
But yeah I mean, there are so many things that are very difficult to animate without physics. I was playing around in Daz3d, and it already has automatic shapekeys/blendshapes when you bend the arms or legs, but still it’s impossible to do something like crossing arms without clipping. Soft body physics in animation is yet to be solved I think.
I’ll give the closed loop a try, but I think Blender may have a similar problem as Maya. It doesn’t allow the last bone to be connected back to the first bone. Your approach is a bit different in that the markers form the loop themselves, but they need to be stretched.
Can ragdoll help in animating a character grabbing another character and throwing him around? For example, https://www.youtube.com/watch?v=nqZ1kN4Wkdw, starting from 1:00. I assume I would use the Attach Constraint between the hand and a marker on the other character, enable the constraint at the frame of grabbing, and disable the constraint at the frame of release/throwing?
Can ragdoll help in animating katana sheathing or unsheathing? Note that katana is curved, so the sheathing/unsheathing motion is also curved. I think this might not be possible because the meshes in ragdoll are convex? Anyway, just to illustrate what I hope to achieve better, https://www.youtube.com/watch?v=3PWZZrE0OYI
Starting from 2:14
You can see Vergil sheathing and unsheathing his katana many times throughout the fight, although it’s often not fully shown. I think it was done by motion capture so they had real physics. It’s one of the cases where the motion is determined by constant collision in real life, and therefore very hard to animate by hand.
Edit: On second thought, maybe I can make a closed loop with markers for the sheath? But how do I make it so that the sheath would not deform at all?
Nah, just make the hand Behaviour = Animated while she’s being flung, animated it to Simulated upon releasing.
That action would not benefit from physics. It can only move along 1 axis and does so in a linear way. Would not bother with any kind of simulation here.
But katana is not a straight sword. That’s the difficult part. The path it follows as it is unsheathed is a curve following the curvature of the sheath.
This is very off-topic, and I’m effectively saying “Don’t use Ragdoll”, but while Ragdoll is the right tool for many jobs, this just isn’t one of them.
An object of any curvature is a matter of finding the centre of the circle it forms and rotating it from there, such as this 90-degree bent sword.
Simulation would definitely make this far more complicated, for no good reason.
Your other example of a character getting tossed around however, that’s an excellent usecase.
I cannot set the rotation limit larger than 180 degrees. Why is that?
Edit: Also, I think there might be missing documentation on a feature? I was in Live Mode, using IK to move an arm. I couldn’t push away other markers, until I accidentally pressed Shift. I think what Shift does is keeping all the markers active so they can be moved? I don’t think that’s mentioned anywhere.
Edit 2: I can’t get the ragdoll from Load Physics to attach back to the same character it was created for.
Edit 3: I followed the method you used in this video. https://www.youtube.com/watch?v=zWEO_vCkcwE
Appending in this way works, but linking does not. It’s a bit of a problem because if I have to append the character in every new scene, the file size of the scene will be very big. Linking allows you to use the same object/character in another scene without the full file size.
There is another problem, although maybe the it’s Blender developers that should handle this bug, but I’ll let you know anyway since I think a lot of people will run into this problem. There are two ways to Append or Link. One is as you did, File>Link or File>Append. The other way is from something called Asset Browser. You right click something, then “Mark as Asset”, then put it in a folder. In a new scene, you can drag and drop your asset, and it either Appends or Links depending on the settings of the Asset Browser. Blender has been pushing people to use the Asset Browser, so I think most people use it to “Append” now. But I have tested it, Appending from the Asset Browser also bugs Ragdoll out. It is not the same as Appending from the File dropdown.
Edit 4: Found the solution to the problem with Appending from Asset Browser. After you drag and drop the collection, click the dropdown arrow next to “Add Collection”, tick off “Instance”. Now it works. Now only the Linking problem remains.
This is currently what it looks like when you try to use Ragdoll with a linked character https://youtu.be/nS3v2UrqYFk
Another question. How can I select multiple markers in Manipulator Mode?
Another question. The fingers and arm move out of place upon entering Live Mode. Why is that? I suspect it has to do with overlapping markers, but I have made sure the markers do not overlap. I even gave them the same overlap group to make sure they don’t overlap, but it still does this.
Actually, I just tried turning off Self Collide, still the same results. This has nothing to do with overlapping. It’s happening because of another reason.
Okay found the bug. For some reason, one of the rotation limits on the hand marker is 5 degrees, which is less than the minimum 10 degrees allowed in Ragdoll. That made the hand twitch upon entering Live Mode. This is definitely a bug because I used the gizmo to set the rotation limit, and there is no way to set it less than 10. I don’t know when it turned to 5 but I think it was after I assigned markers to the fingers.
This is a bug. Parenting a bone to another in a rig messes up Ragdoll pretty badly. I know the best practice is to finish the rig completely first before assigning markers, but sometimes some things are after thoughts.
Looks like the Blender property itself has a maximum value of 90; Ragdoll does support it, so we’ll investigate why this is.
Live Mode is overall actively developed and lacks much comfort. It’s safe to consider it a Tech Preview in today’s version, the next version will be a 2.0 of it with more conveniences.
Load Physics generates an entirely new scene based on the contents of the .rag file. It does not consider anything already in your scene. That’s what Import Physics does, however it is not yet implemented for Blender. See here for how it will eventually work.
Will investigate, I remember we did struggle to cooperate with linking. For now, it seems appending is the safer route. I have not heard of the other Asset Browser approach, will investigate this as well. Thanks for letting me know.
Ah, interesting. Thanks for reporting this, investigating this too.
With Symmetry enabled, both sides of a character will be selected automatically. To manually select multiple Markers, you need to disable symmetry. Top-center icon, it’s orange here.
Hard to say without seeing what you are seeing. Does it work in a new scene with just a box? With a single bone chain?
5 degrees is fine, just make sure the finger doesn’t start outside of the limit. The Manipulator UI only goes to 10, but it’s a recommendation only.
Quite. Try saving and re-opening the scene. Sometimes, making a cube and undoing can help, as undoing generally restores Ragdoll’s internal memory management.
Great observations, many solvable bugs found, thanks for this.