I started playing with it and I have an issue where markers behave almost as if they are in the water. I thought it could be because our scene scale is 10x bigger than the default Maya. So I increased the scene scale from 0.1 to 1 on the solver node but now markers are detaching from each other. It seems like the spring that is holding them together is loosened.
I had a hard time understanding which attributes I should play with.
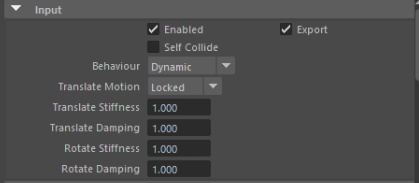
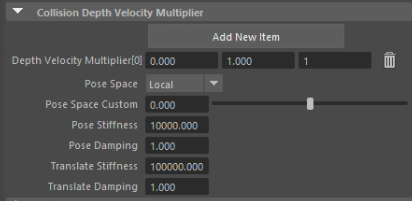
I guess I should increase attributes on the ‘Input’ field, instead of ‘Collision Depth Velocity Multiplier’
Now that I tried to scale markers to match the geometry, they behave more predictably. I also wonder how can I get some movement on the hip without it falling down?
In youtube videos, there are attributes for spaces but I don’t see them on my attributes.
Would it be possible to include a playblast or screenrecording of what you are seeing? How are they detaching exactly, what does it look like? They should not detach under any scene scale.
Which version of Ragdoll are you using? You can spot it at the bottom of the Ragdoll menu, the latest version is 2022.12.21.
About the hip, I wanted to have it follow the animation but not quite one-to-one, have it settle with physics a bit.
Edit : This detaching issue is much more stable, I don’t think they ever detach after scaling their shapes up, but I am not sure if this keeps happening and I have to use these shapes for a thin character
The key detail here is Translate Motion = Soft. As objects get larger, they also get heavier. And this softness is a force trying to keep Markers together. As it gets heavier, it’ll have less and less of an effect; like pulling two planets together versus two paperclips. Very different forces are required.
In this case, I’d expect tweaking Translate Stiffness to be enough, but a value of 1000 is really high. Normal values are between 0-10. I’m also suspicious about your pivots. Can you try replicating your original setup using a simple joint chain?
You can also try experimenting with Density = 0 and Mass = 1. That’ll give Markers the same mass, regardless of their size.
I don’t quite understand what you mean by pivots but I tried to export just joints to a new scene and created the same setup and this is the result:
I can send maya file if needed.
Edit: Detaching seems to be gone because I forgot that I adjusted scene scale from Ragdoll Preferences to be 0,001 and then changed it to 1 from solver so now pref has scale of 10 and solver has 1 I guess that’s what it should be for 180cm character?
You shouldn’t normally, if ever, need to change Scene Scale in your preferences; that’s a heavily advanced attribute I would (and do) avoid if possible. When you change it, don’t forget to restart Maya or reload the plug-in too; that’s one of the few preferences that requires a restart.
For completeness, you are referring this this preference?
Next, can you let me know what steps I can take to reproduce an issue you are seeing?
Would it be possible to record yourself loading the manikin, and demonstrating the problem? Then I can reproduce that here and hopefully find a solution.
I would expect hips to follow the animation world space and simulate without having it kinematic like here but I don’t see pose space attribute like in the video. I check attributes and there is one under extra attributes which doesn’t seem to do anything visible for my case
I have couple of questions,
About pivots, I realized it behaved a bit better if I rotate capsules so that they are not lengthwise. So maybe I am doing something when placing markers? Like this (sorry for bad drawing):
And does it matter if I select joints for creating markers? Because on a character that is playing a run cycle but even if I set stiffness to let’s say 10 or 100 on rGroup, they don’t fully blend to animation position. Could that be related to me selecting joints instead of controls and such or what are best practices for creating markers on IK spline, IK arms, IK legs?
Sorry if I am not making sense, if so, let me know so I can try to explain myself better.
It can be found under Ragdoll → Constrain → Pin. You can either animate this, like you do for the hip, or you can use a Maya Parent Constraint to make it follow the hip itself.
This is perfectly fine, and works well for something like the spine which is often more wide than long per control. The only thing that can help the simulation stay stable is for the pivot to always be within the shape. For example, if you not only rotate a spine shape, but also move it to where the arm is, then the pivot would be outside of that shape, and the solver generally does not like that. It isn’t something that’s possible in real life, and Ragdoll only knows how to simulate real life.
You can visualise the pivots Ragdoll knows about via the Draw Hierarchy option in the solver.
Joints are often easier to work with, because joints are very clear about where their rotate pivots are. That is, where it would rotate around when you animate the rotate XYZ channels. When you have something like a NURBS control or a Maya mesh, you can move the pivot to someplace else, but it isn’t necessarily visible that it was moved. The NURBS control remains in place and make it look like the rotation happens around it. Ragdoll doesn’t know what the NURBS control looks like, only where this pivot is.
Can you demonstrate this? It’s hard to imagine what you mean. It won’t matter whether you select joints or controls, the only thing Ragdoll sees are the worldspace position of anything you select.
No matter what I try, I can’t make it follow 100% animation with any of the settings unless I set markers to be kinematic. Any idea why this is happening?
It’ll never achieve the animated pose 100%, because your animation is leading the simulation. Ragdoll is given your pose, and then applies forces onto the Markers to try and nudge it in the direction of your animation. Therefore, your animation will always be 1 step ahead of the simulation.
Kinematic is different; there are no forces there. The animation is directly copied into the solver. The advantage is that you get 100% to where the animation is, at the cost of not being able to respond to physics, like gravity and contacts with other Markers.
That said, you can get closer by lowering the Damping parameter. Damping is a way to remove movement from a Marker; it’s what keeps things nice and fluid. In this case, you don’t want nice and fluid, but fast and accurate. Try playing with that value, somewhere around 0.1 and 0.01 should suffice. A value of 0 is possible too, and you might want/need to animate it for frames that are extraordinarily fast. You can also animate the Kinematic attribute.
I am trying to understand why markers pop between first and second frame. Could that be that I created ragdoll by opening a rig scene and then I replaced reference in the animation file with that ragdoll + rig file I created.
Also, I guess for feet I should key on contacts so that ragdoll wouldn’t have to solve it on the ground?
Limits are most likely the cause yes. It’s likely that the input animation starts outside of the limits. You can resolve this by either tweaking the limits or tweaking the input animation.
It depends on the effect you’re looking for. Sometimes, leaving the feet as Kinematic is enough if the foot animation is already in good shape.