Pose stiffness

Unfortunately I can’t post any image from my rig/animation but I have a question about the pose stiffness. When the animation is fast and snappy, and the marker behaviour is set to inherit or dynamic, I don’t quite get how the pose stiffness work. I mean, it seems that the pose stiffness goes only until a certain point. I mean, I can set the pose stiffness the higher as possible, but it’s still too flexible. How can I set a marker stiffness to be so subtle as it’s almost kinematic? Is limiting the angle the only way to do that?

Is it a good idea to have like zero as totally flexible (as it is) and 100 totally stiff (like kinematic)?

Thanks

Additional note, sometimes the markers do not respect the limit angle… when the animation is really fast

Hi Fernando ,

Whenever you’re dealing with fast moving animation it’s always advisable to lower the pose damping and increase the pose strength
Pose Damping is like pumping the breaks the motion so the higher the value the slower your marker is going to be , not great with fast animations.

‘Inherit’ refers to the values the marker will ‘inherit’ from the sim group .
image

I hope this helps.

Thank you for the answer, Jason!

Sorry, but 2 more questions:

  1. Where can I adjust the pose strenght? Is it the stiffness?
  2. If I select the group and set the stiffness to 10, then I go to the marker and set to 0.3, will the 0.3 overwrite the 10 or the final result be 0.3 of 10 = 3?

Thanks again,
Fernando

Yes Pose stiffness,

The group acts as a multiplier for the values of the markers.

If you open up a new scene, draw some joints and try to replicate the problem you’re having that would be very helpful. That way, there’s nothing proprietary and we’d also be able to replicate the problem on our end to try and help you. I’ll do my best trying to interpret what you mean, but odds are it will not be right.

Yes, that is correct. There is a quality/performance trade-off to be made, where the default settings are somewhere in the middle.
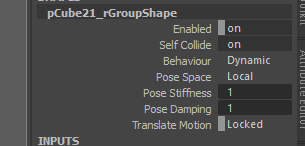
Have a look here.

Notice 2 things.

  1. Damping has an effect on how close thing tentacle gets to following the animation
  2. There is almost no difference in behaviour between 100 and 1000

You first option should be to decrease Damping as much as you can, it has no effect on performance. But at some point, especially in fast-moving animation or in very deep hierarchies like this tentacle here, you’ll need to sacrifice performance for quality by letting the solver do more work.

Notice how an increase in Substeps and Iterations from 4 to 8 enables values of Pose Stiffness greater than 100, in this case to somewhere around 1000. But past 1000, and 8 is not enough.

Values past 8 are rare, but are sometimes necessary. But, this is not the whole story.

The Meaning of Mass

These values refer to forces, and each link in the chain is a physical mass. Apply the same force to a tentacle that is 1000x heavier, and it will appear to have less of an effect. Think of it as pushing a car with all your strength. Then apply that same strength to pushing a building. Then the same force to pushing a person. Then to an empty Amazon box. The end result is different each time, even though you apply the exact same force.

So depending on the total mass of your character - whether it weighs as much as an empty paper box or a planet - these values will differ. So my recommendation is to find a suitable scale you like, such as Maya’s default centimeters, and model your character at that size. And then stick with that size for all of our characters and experiment with these 4 values.

  • Pose Stiffness
  • Pose Damping
  • Solver Substeps
  • Solver Iterations

To try and build some intuition for what combination of values produce the desired effect. A character 10x the size, would need different values. This is also why it’s extra important you share a screenshot, or series of steps we can follow on our end to reproduce your situation.

1 Like

This reason here is similar to why Pose Stiffness only goes so far.

In Ragdoll, limits are “soft”. Meaning that whenever your limb collides with its limit, a force is created to push that limb back. To control the amount of force, you can use Limit Stiffness and Limit Damping. They work exactly like Pose Stiffness and Pose Damping.

Notice how a lower value makes the limit more soft, and a value of 0 is equal to not having a limit at all.

In a more realistic setting, there will be many more limbs and some may weigh a lot more.

Notice here that when I increase the density of the top-most limbs, suddenly the limit struggles to keep the limb within the limit. Like for Pose Stiffness, the solver Iterations and Substeps can help Limit Stiffness reach greater values.

4 Likes

This post is really helpful ! Thanks @marcus

Yes this is really good stuff! THank you guys for the help! Exactly what I needed