Pilot cockpit setup. Questions, suggestions

https://chmurka.eiver.pl/s/Q4dsBb6TkAtwELC

Above is the link to an almost final setup for a cockpit ragdoll. Sorry for the mess in maya’s objects names or groups, but it is hard to keep it neat after using 3dsmax naming convention for 20 years. The first seconds (entering the cockpit) are not to be visible in the film. End shot will be a helmet pov. It makes animation somewhat easier in many ways…

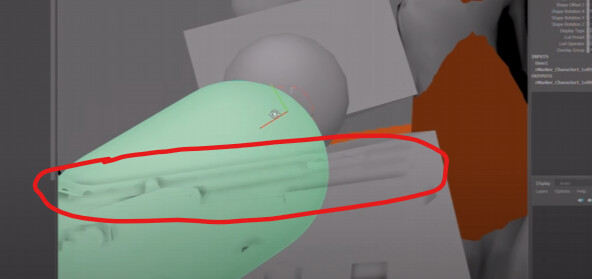
-Look at the stick. After assigning an object to the ragdoll plugin, it turns color (if dynamic mode is on). But then I can’t manually animate its movement anymore - keys are created, but values jump back to the ones from the default (assignment) moment. Try to animate the stick to slightly “help” it to get between fingers over the course of the whole animation and you will see what I mean. Instead, I had to make a squarepusher kinetic box that pushes the stick slightly in any time chosen by me. Rather ugly workaround.

-I get some errors while trying to bake it back onto the original mocap animation. I will report more about them in the next days. You can try to record this animation to see if something strange occurs. There is a hidden pilot’s skin in the scene. I wonder how it will perform after proper baking. Bones are not everything. Skin is :slight_smile:

Two constructive suggestions, I hope:
-When working with a more-than-ragdoll setup with multiple objects around, it is very hard to turn the view for Limit helpers to be visualized. I think they should always be visible, no matter the camera angle. Colors are enough to see which is which axis and I spent too much time to rotate the view so they magically appear.

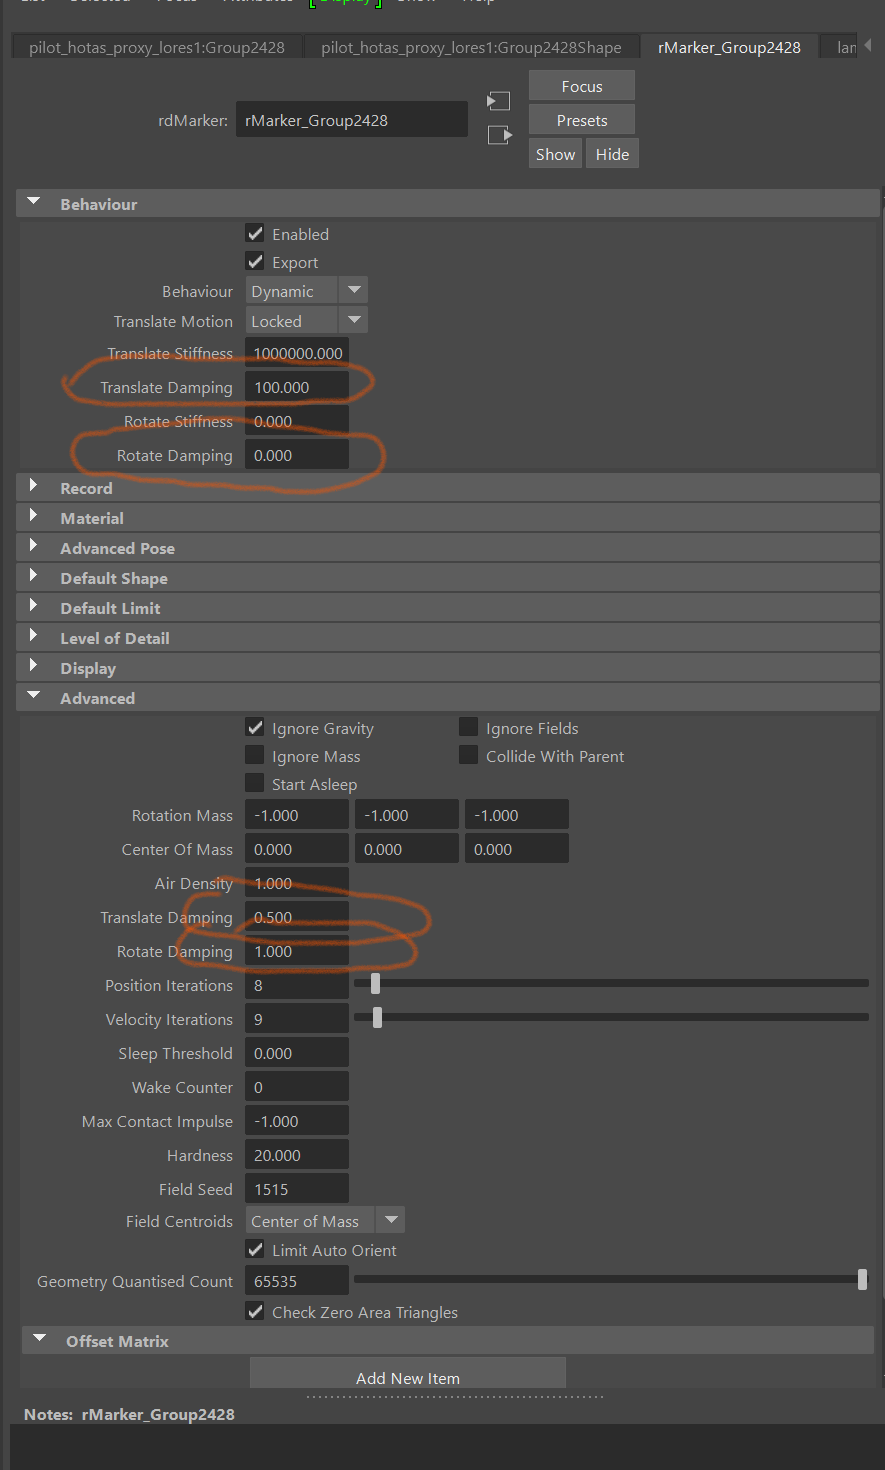
-A hover help would be good in case of almost all parameters on the right. For example - what is “Max contact impulse” and why it’s -1 on default. Or how Pose twist value affects the object movement in general? Some of these parameters are in docs and some are not. Changing many of them seems to do nothing, so testing each of them via hundreds of simulation runs is counterproductive :slight_smile: I know you are a small team and writing documentation or even hover help dialogs is a full-time job, but please consider this among new versions.

There are some more, I try to write them down right after they occur, but sometimes they might be not a Ragdoll problem but my basic-only knowledge of Maya.

Hi @Norman_Leto,

Thanks for putting this together, I’m happy to try and help with this.

However, a few points.

  • We cannot open the .mb file format, would it be possible to upload a .ma version? A zipped version will have about the same size as .mb.
  • The file size is very large (120 mb); the less happening in the scene the quicker it will be for us/me to identify the issue and help you. Can you try and reproduce the issue in a new scene, with the least amount of objects?
  • Media; we love pictures and videos. Would it be possible to make screenshots, playblasts and/or screenrecordings of each thing that you see, such that we know what we should expect to see?

This one for example, needs a screenshot but ideally a video. It’s not clear which render of limits you are referring to or what is considered hard.

This one is tricky, because we are limited by what the Maya UI allows us to do. Hover help (tooltip) is not a concept Maya is aware of, but we can certainly make a breakdown of attributes and their effect in our documentation.

To answer your immediate questions:

Attribute Description
Max Contact Impulse This attribute is located under the Advanced tab of Markers, for good reason. These are attributes you are not encouraged to interact with, outside of advanced use cases. This one for example is only relevant when the solver is set to Stable rather than the default Strong and determines how much force an object is able to apply to another during contact. For example, drop a ball to the ground, and if the ball is heavy and falls fast enough the Max Contact Impulse limit the amount of force the ground can push back on the ball and cause the ball to penetrate the ground.
Pose Twist This is related to the Rotate Stiffness attribute. Normally, stiffness applies to all axes of rotation - X, Y and Z. “Twist” in this case refers to the X axis of rotation, and Pose Twist is a way for you to control how much Rotate Stiffness should affect the Rotate X axis. For example, you may want an arm to be weak in the extend/contract axis, but really strong in the twist axis. This is also an advanced attribute.

Feel free to continue asking about specific attributes; whenever they are documented here they will also show up in the search function of this forum, such that they can be found in the future. :partying_face:

1 Like

Hey, thanks for quick reaction.
Here is the .ma zipped file:
https://chmurka.eiver.pl/s/Gr5HWzA5HLGDYGf

66mb, still. I was unable to remove bitmaps and unneeded materials because I find it hard in Maya as for my limited knowledge (still learning). After assigning a white material to everything it still does not remove the unused ones. I am sure it is basic stuff in maya, but for a 3dsmax user, proper scene cleanup is not that easy. Still learning maya - only to be able to use the ragdoll plugin. There is nothing like this in 3dsmax world, even with a Tyflow plugin which seems to make max a huge procedural animation toolset again.

For limits visibility you can simply try to change finger limits with a perspective view active. It’s not that easy to initiate (show) them on screen. Foreground objects sometimes seem to block the click-access.

Didnt know that maya has problem with hover help. If so, the only solution (from artist pov) would be giving names that are less technical oriented (like manifold collision method :slight_smile: and more artist friendly. I have technical background so I get most of these, but still, sometimes scratch my head why describe something like: “=-1”. This is suggestion only, perhaps it is only me who would like to get more adobe like descriptions. But Maya users are used to such naming, and my long 3dsmax background hits here as well.

Thanks for the .ma, I was able to open the file.

But it’s not clear what the problem is, would it be possible to demonstrate? Are you able to make a new Maya scene and use only cubes and capsules to reproduce the problem, or does it only happen in this file?

First, I am sorry for flooding the forum recently :slight_smile: After several hours of trial-error method I’ve found the solutions for problems I mentioned in the initial post. I’ll try to describe the solutions for others who may struggle, but please correct me if I am wrong. There are about four problems described below. If possible, you can break comments into several replies in the thread, it would be more readable for other users.

  1. LIMITS ANGLE VISIBILITY ICON

The Limits ‘angle gizmo’ visibility can be viewed only in the first frame of animation. In other frames it disappears and ticking the on/off box does nothing. Here are two videos: first is the problem, and second is the solution that worked in my case:

Problem:

Solution:

  1. SWITCHING OBJECT’S BEHAVIOR TYPE WHILE ANIMATING IT WITH KEYFRAMES:
  • Animating kinetic / dynamic body with keyframes should be done before assigning it to Ragdoll solver. If you don’t do it, then you have to animate on splines in the first frame only. Trying to animate in further frames results with problems (effect not visible until you get back to the first frame and so on. I had to turn off caching completely to be able to manipulate objects with keyframes.
  1. RAGDOLL CACHE WORKFLOW EXPERIENCE
  • It seems cache should be off for most time, only for preview purpose. The first frame of timeline is most important. In long animations (mocap based) it may be a problem, since keyframing the object mid-animation requires to re-watch the thing from the start again and again. But since it is physical (deterministic) model there is possibly no other way.
  1. QUESTION: HOW TO KEYFRAME OBJECT UNDERNEATH, DRIVING IT’S DYNAMIC SIMULATION?
  • When rigid body is initiated into simulation as dynamic, there is no simple way to introduce the basic keyframed animation driving the dynamic type of motion. As video example - look at the stick - I had to switch kinematic-to-dynamic multiple times to achieve the two-sided interactions of hand and stick:

(This is weird because mocap rig IS the keyframed animation and adding dynamics onto this base motion works without problem. Perhaps there is a IK hierarchy or joints needed? I even tried the simple case of bouncing ball with keyframed base animation and couldn’t make it work. It would be great to see a solution on the simplest scene, bouncing ball for example)

  1. RESULTS

The final result can be viewed here. Rokoko glitchy mocap corrected with ragdoll dynamics plugin. There are bad moments, but in final movie these are different camera angles:

Thanks, please take your time in eventual reply.

Fantastic @Norman_Leto, this is an excellent way to demonstrate the problem. Above and beyond, it makes a lot of sense!

Limits Visibility

This one is key; there are attributes in Ragdoll that cannot be animated and those only have an effect on the first frame. Limits is one of them. They are visible during playback to show where your limbs are within those limits, so that you know when they are limited and when they are free to move.

Switching between Dynamic and Kinematic

Unsure what is happening here, but what should happen is for the start of a simulation to come from where your object is on the first frame and then it will ignore any animation happening after this point. Then it doesn’t matter whether it was animated before or after having a Marker assigned.

Can you try this and let me know if you are getting the same result?

Cache Workflow

This is my experience also. It can be useful when you are happy with a simulation and want to make changes to the animation, using the simulation as reference. Or for very large simulations that aren’t running in real-time.

Driving a simulation with keyframes

Hopefully this was answered above, but to put it another way; there are two ways to influence a simulation with keyframes.

  • Kinematic
  • Pin Constraint

When a Marker is “Kinematic” then your keyframes are copied into the solver exactly. Other Markers will still collide with your animation, but will not affect the keyframes. You would use this when you have animation, such as mocap, that you are happy with and only want e.g. a tail or hair to be dynamically affected by gravity and contacts.

When a Marker is “Dynamic” then it is affected by gravity and contacts with other Markers. The Pin Constraint can then be used to guide the Marker towards a position and orientation.

In your example, I can spot that you already have a Pin Constraint for the stick. This is what you would animate. You can also do what I did in the above example, of parenting the Pin Constraint to the stick itself, such that it will move along with it. That way, you can use the original keyframes to guide the Marker.

Dark spots

In your videos, you’ll notice some dark spots. This is Maya’s “ambient occlusion” rendering not collaborating with our Ragdoll rendering.

image

It can be disabled here, whilst you work on limits, to make it a little more visible.

image

Final result

Looks really cool! There is some bounciness in the overall motion of the character. If you use a Pin Constraint to steer him, you can increase Damping for both Translate and Rotate to make things more smooth.

You can also experiment with Translate Damping and Rotate Damping on the Markers themselves, such as the hip of your character.

This is another way to set the Air Density attribute found on the solver node, except per-Marker. Notice how when set too high it’ll be too smooth and keep your Marker from reaching the final position quickly enough.

For the hands, if you haven’t seen it already, I would experiment with the Attach Constraint. It’s a way to dynamically parent a hand to another Marker, such as the stick. Gluing them together. You can animate this on and off to control when the hand should appear to be grabbing the stick.

Likewise for the left hand holding onto the seat, you can use a normal Pin Constraint here to glue it in place. It will act like an IK handle, moving only the upper arm and body whilst keeping the hand in place.

Hope it helps, and more questions then please fire away!

Thanks again.
Quick question, still in the subject. What is the difference between Damping values in the Behaviour tab and in Advanced tab? I see that values are different so it is not a clone. Moreover, manipulating the Advanced tab values have much better and visible effect than the Behaviour ones:

Excellent question!

They have the same name, and act similarly, but refer to different things. The one up-top refers to the damping between two connected markers, whereas the ones under Advanced refers to each individual Marker in worldspace.

You can think of “Damping” as “Friction”, and for the upper values this is friction when an arm e.g. bends forwards and backwards.

The lower “Advanced” values on the other hand refers to their individual translation and rotation.

Let’s have a look at the upper one first, the “local” one.

Local Rotate Damping

Here you can see that as I increase the damping on the group, it increases the damping of all Markers. And as a result, he’s less willing to bend. As though there is tons of friction between each limb.

World Translate Damping

The one at the bottom is more clear with Translation than Rotation.

Notice how the head now refuses to translate. The lower body almost hangs on it, as it slowly moves through space. As though the air was really really dense, like sand. But only for the head.

In fact, this is what the attribute Air Density on the solver node really is. These two Translate and Rotate Damping attributes are multiplied with Air Density to compute the final value. The difference is that the solver affects all Markers, and here we do it individually.

Rotate Damping works the same, except in the case of the Manikin, the other limbs have such a strong effect on its orientation that you can’t really see it much.

Here’s what it looks like if we increase Rotate Damping on all markers, for a bit of a stronger effect.

Did that make sense? They are “advanced” attributes, after all.

2 Likes