Having a lot of trouble understanding/using Live Mode

I’ve spent a lot of time reading the docs and watching the videos but I’m still having a really hard time using Live Mode.

It seemed pretty straight forward in the videos. Activate Live Mode; pose your markers; and stamp your pose back to your animated controls or joints.

But in practice nothing seems to behave how it does in the tutorials.

First, whenever I activate Live Mode everything simulates forward by around 5 frames. So Whatever pose I was hoping to alter has now sagged or moved from the pose I intended to ‘sculpt’.

Next, I’ll Shift-drag on a marker to parent-mask-move it, expecting to isolate the modification to ONLY my selected marker and it’s children like what’s demoed in the masking tutorials. But I’m seeing wobbling, waving movement on a bunch of seemingly unrelated markers, which makes posing considerably more difficult than just working with standard rig controls would be.

The exception to this is if I’m on the first frame of the animation, and ONLY the first frame of the animation, then posing in Live Mode more-or-less behaves how I’d expect.

I’m sure I’m just not doing it right, but the problem is that the right way isn’t all that obvious or intuitive, even after spending time reading the docs and searching the forum. It doesn’t help that the UI no longer matches the documentation, either.

In general Ragdoll has been exceptionally easy to use and figure out, more so in my opinion than most native Maya tools. I wasn’t expecting to struggle so much getting up and running with Live Mode but can’t wait to understand it better because it looks so powerful.

Here’s a video example of the way the markers sag when I turn on Live Mode, and also how masking doesn’t seem to isolate marker movement.

Thanks for any help.

Hey @Andy, thanks for sharing your struggles, I can see a few red flags that I’ll elaborate on for you today.

1. Self-intersections

The reason for taking 5 steps forward and for Markers that seem unrelated are moving as you drag, even when masking, is because your character is not at rest. There are conflicts happening in the start frame, which I suspect is due to self-collisions, that Ragdoll will try and resolve.

A good litmus test you can do prior to starting to animate any newly setup character is this.

  1. Disable gravity
  2. Play

Your character should not move. Simple as that. Any motion happening here will be due to:

  1. Self-collisions
  2. Limbs being outside of limits
  3. Any pin constraints pulling the character away from its starting position.

My guess is that box at the center of the hand is intersecting with some of the grandchildren.


2. Complex Rig

If transferring the Live pose onto your rig isn’t working, it is likely the rig you transfer onto is too complex.

Live Mode is currently limited to the simplest of FK rigs. Try any of the example assets in the Ragdoll UI to get a sense of how it works and what it works with.

Here’s a video with more details on this.

Let me know if this helps, and we’ll continue from here!

Hi Marcus!

So I spent some more time and have partial answers to some of the things I was seeing.

You were right on issues 1 and 2.

The loose, wavy fingers in my character’s setup were due to them being animated beyond their rotation limits (I think).

The rig, even though I was in FK “mode”, had other space switches and stuff going on that I didn’t realize. So that’s why the poses wouldn’t transfer.

The other stuff

So for the rest of my testing I went back to the example assets. I couldn’t reproduce everything I saw when I first posted, but I’m still not having much luck getting where I want to be.

Here’s what I have:

1. Live Pose transfer not working on Example Assets in Z-up scene.

I had read here, down the page a bit, that importing assets should work regardless of scene up-axis. I might be missing something simple but here’s how that looks on my end.

After struggling in Z-up for a while I tried importing to a Y-up scene. Now I can manipulate the capsules in the regular Live Mode way, scrub around on the timeline and transfer keys using the Live Mode interface. Progress.

2. I still can’t really figure out Interactive Mode

With things starting to look a little better I press the Lock icon and switch back to regular manipulation tools. But neither moving the joints or the pins interactively drives the physics sim. I just couldn’t figure out how to do it.

After digging around some more I found this post and after carefully watching the videos at half speed I figured out that I had to open the wrench and click the pin icon to get anything to happen.

A note here is that there is no mention (that I could find at least) of the wrench menu or what the various tools in that menu do in the documentation which is definitely a barrier to learning how to use this.

But even with pin mode activated it’s still not behaving like your video example. I’m using the same Pirate example asset. I’m making a pin on the wrist in the same way (as far as I can tell). But it’s not acting at all like yours. Look at those fingers! :frowning:

The stiffness values also don’t seem to match the behavior in your examples. I can’t figure out why my results are so much different than yours.

Anyway, I tried following the rest of the steps in the linked post but everything’s still a mess. The physics are erratic and swimmy and I just can’t wrestle anything under control.

I see this and it looks so dang fun and easy:

I want to be able to do this:

But as of right now I can’t get anything like it.

I’m also getting other problems I don’t have video capture of. Sometimes going in and out of Live/Interactive Mode seems to break the physics. All the capsules collapse in a heap on the ground and won’t reconstitute. The hands on the pirate will periodically start wiggling violently out of control. I can’t get the kind of responsiveness in my pins, even with the same stiffness settings I’m seeing in the demo video. Sometimes the physics will stop simming at the end of the Live Mode timeline, instead of automatically extending the timeline, and won’t start again. In short, it just seems to act a bit inconsistently from session to session and I just can’t get it to work like in the demos, even using the sample assets.

I think something that would really help me is a slow walkthrough (or a detailed write-up) of setting up a character (like the pirate) for Interactive Mode animation, and then a walkthrough of the actual animation process.

If something like this is already out there, that would be awesome! I checked the Ragdoll Youtube channel and didn’t see anything, though. The best I could find was the forum post I linked.

We’re about to get started on an initial milestone at the studio and I really think Ragdoll is going to be a game changer once I can figure out how to use Interactive Mode the way you and @Jason do. I’m trying to get a jump on it so I’m not struggling to figure out how to use it under a deadline though, so thanks for your help!

1 Like

Thanks for the thorough notes on this @Andy! I will do an equally thorough answer for you on Monday, first thing. Hope you are having a great weekend so far!

Hi @Andy, let’s have a look!

(Hope you don’t mind I updated your Google Drive links with links to uploaded videos here, so we can watch them without leaving the page. It also helps prevent eventual “link rot” such that future generations can still see them. You can upload videos here by drag-n-drop.)

From the time I wrote this, I actually made a breakthrough that will allow use of Live Mode transfer to rigs of any complexity in Maya. I wasn’t expecting this, but this does mean you will be able to pose arbitrary rigs, including IK controls, using Live Mode in the near future. Just FYI!

I can confirm this, this is a bug. The reason it’s happening is because of the default assets; they were originally made Y-up, and have a 90 degree rotation on their top-level group in the Outliner. It should not affect your production assets or any asset made with Z-up.

I can also confirm this will not be an issue in the next update. For now, what you can do with the default assets is unparent the root joint and now Live Mode transfer will work.

Very true; at the time of writing this, the wrench was very experimental and it wasn’t clear they should continue to exist or not. But we now know the usefulness of having pins active during Interactive Mode, so I’ve gone ahead and added the missing section now.

Ah haha, yes. Noodle fingers! Per default, the rotation stiffness of all Markers is set to 0 in Live Mode. Such that they don’t counter-act your posing. You can enable it using the Tense button on the right-hand side.

image

This will make the fingers (and arm) still respect the rotate stiffness, whilst still responding to your Pin Constraint and the magnet as you click and drag in Live Mode.

Hm, if you can reproduce this, let me now. Smells like a bug.

Normally, wiggling is the result of two or more forces contradicting each other. Like for example in that other post you found:

The hands couldn’t reach the face, because the head was responding to the rotate stiffness of the shoulders, torso and neck. Greater force being put on the hand to try and reach it resulted in even greater forces trying to push it away. So something to keep an eye on is to ensure there isn’t too many of those forces contradicting each other. Which is easier said than done, but should come with experience.

Here’s my favourite example of this in the wild. :sweat_smile:

Eeek, yes please do let me know how I can reproduce what you are seeing. This sounds bad!

There isn’t anything at the moment because frankly, the technology was new to us as well. We have been exploring it ourselves to try and find a workflow to recommend, and have been listening to the community for what they can find. I’ll put together what I’ve personally found so far and maybe that’ll help. Stay tuned for this shortly.

Hope this helps, and keep posting updates about your progress, this helps push the progress of Live and Interactive Modes and is exactly what we need!

1 Like

Hi again,

I’ve had a look at Interactive Mode now and have concluded that it is faulty! Sorry about that, it seems to have been broken in the latest release and I noticed it just now. It’s not clear yet what is the fault, but I will investigate this and have a fix for the next release.

For completeness, here’s the problem I’m seeing with pin constraints in Interactive Mode.

If you are able to capture any more issues, like the ones you mentioned, that would help a lot. For the time being, I would recommend against Interactive Mode for production use. Live Mode is still safe.

1 Like

I’ve narrowed down the issue, and it’s related to a new feature of the latest release designed to make Pins more predictable; this is a bug that only affects Live Mode and pins.

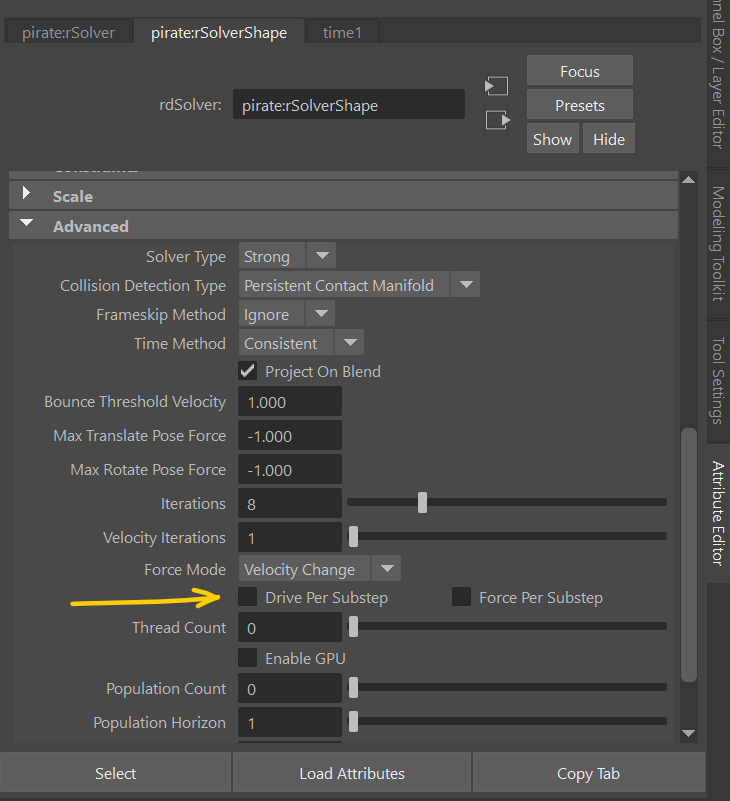
You can work around it for the time being by setting Drive Per Substep = Off.

I’ve also found that when you decrease the time range during Interactive Mode it will stop responding to changes until you re-enable Interactive Mode or restore the timeline.

Both of these will be addressed, if you find anything else please let us know!

2 Likes

Aha!!! I didn’t make the connection that it was a time range change that might be doing that! Ok, that’s awesome. It looks like you found most the stuff I was having trouble describing with those last two examples.

I’ll keep my eyes peeled for more and try to capture it whenever I can.

Thanks so much for the detailed follow up and workaround idea. I think I can start practicing and getting the hang of the workflow now, even if there’s still some fixes coming down the pipe.

:point_up_2: This is HUGE news right here! :exploding_head:

Hahaha, that is a pretty good comparison. Fry was Ragdollin’ before it was cool.
knobs

2 Likes

Loving that gif; barely noticed the logo, it integrates so well. :slight_smile:

In related news, the latest release solves the issue with Pin Constraints in Interactive Mode:

You were probably just distracted by his two right hands :sweat_smile:

Great news about the fix! I’ll update now, thanks!

1 Like