Any tips or suggestions for cloth animation?

I was used search but was found nothing about cloth, like cape for example.

1 Like

It’s a great question and one I’d like to dive deep into as soon as we’re back from SIGGRAPH. Stay tuned in this thread.

In a nutshell, I’ve had the most success treating cloth - like capes - as a low-poly mesh. Where each vertical polygon edge is a joint chain with assigned markers. To keep it together horizontally, you either may not need to - it depends on the action - or it does in which case I’ve used Distance Constraints. But nowadays, with the release or 2022.07.20, I’d experiment with the Attach Constraint which might be better suited! It is able to maintain both distance and “bend resistance” via the Rotate Stiffness attribute, and is exactly the same physical properties shared between parent and child Markers.

I expect there will be a few techniques one can use for cloth, depending on the type of cloth and what it will be doing.

  1. Scarf, a single joint chain
  2. Skirt, a “low-poly mesh” of markers
  3. Layered clothing, box shapes, with each corner distance constrained
  4. …? To be explored! Can you think of any?

Here’s one (rendered) example. I’ve got more behind-the-scenes for this one on my other machine which I’ll share here next week, along with new examples and at least one tutorial.

2 Likes

Putting together some material for this now. Here’s a first draft.

Scene File

In this example, I’m assigning Markers to each control with a Shape Type = Box. Aside from the obvious intersections - which could be addressed by increasing the depth of the box shape - it works quite well. However there are a few issues.

Pivots

The rotation pivot of each Marker will be at the rotation pivot of the control. Normally, this is what you want. For example, you’d expect your lower arm control to rotate around the elbow. But in this case that isn’t what we want.

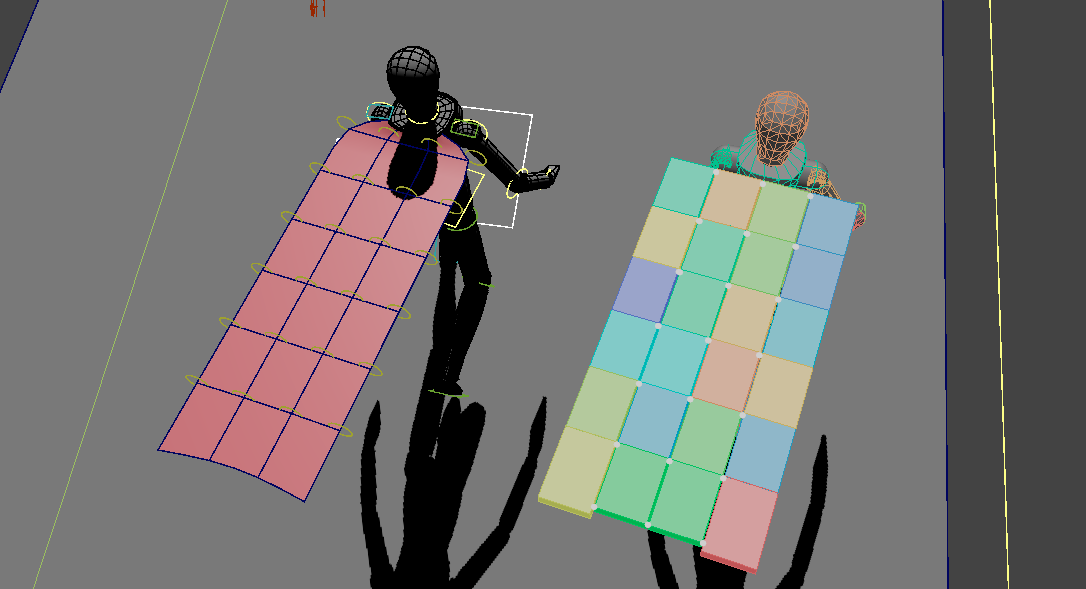
Notice how the the pivot of the control in this case is located at the edge of the cloth. At the vertex. What we really want is a Marker for every face of this cape. And see how we’ve got 4 rows of Markers, but only 3 rows of faces.

The result is boxes rotating around their center rather than at the vertices like we’d expect.

Flex

Another thing I think looks a little off is how stiff our cloth is. Like he’s wearing a carpet. This can be controlled via both Pose Stiffness but also Translate Stiffness, if we let our transforms be Soft.

  • Translate Stiffness will make your cloth more or less stretchy
  • Pose Stiffness (or Rotate Stiffness) will make your cloth more or less bendy

Returning with an alternative method that solves some of these issues shortly.

2 Likes

Thank’s for your time, i wasn’t able to make stable cloth but i’ll try one more time soon. I have some $ at the end of the month, waiting news about indie licenses)

Here’s a more successful example. In this case I’ve assigned to just the first 3 rows, leaving the last row of controls untouched.

Scene File

Here’s some stress-tests to make sure it works on things other than these two animations.

Here’s a close-up on how markers have been assigned.

Notice how we’ve replicated the polygonal faces with boxes. Also notice how each box shape has been offset from its control.

Notes

Some of the less obvious, and mostly optional things about this particular setup.

Solver Type

In the rSolver node, there is an attribute called Solver Type with 2 options - “Stable” and “Strong”. You generally don’t need to edit this as the default is tuned for ragdoll-type characters. But in the case of cloth, I found slightly better results from the Stable option.

Stable is what is commonly used for destruction-like effects, it’s what Houdini typically uses for example. Strong on the other hand is more common in robotics and provides greater strengths at higher values of Stiffness.

Stable vs Strong

Spring Type

Every Marker and both the Pin and Attach Constraints has got an attribute called Spring Type. It’s not normally visible, because the default value covers the vast majority of use cases, especially those involving limbed characters.

But in this case, because we are doing cloth, we can leverage the more elastic results coming out of the Force option.

Acceleration (default)

Defaults work well for limbs, but not so well for cloth. In this case, only the Markers have this option, the Distance Constraints operates on slightly different rules.

Force

In this case, we get a more elastic look but also more similarity to how the Distance Constraints work.

Self Collision

In each of these examples, there is no self-collision. I found better results this way, as the boxes would otherwise collide and get stuck with each other, making the overall cloth behaviour more rigid.

Friction

Both the character and cloak has got a Friction and Bounciness of 0. This is likely what you’d expect, cloth normally slides effortlessly over a body and bounce isn’t really relevant here.

Retargeting

Since only the first 3 rows of controls are assigned, how does the 4th row of controls get any animation? The answer is retargeting! The 4th row will have identical animation to the 3rd, with an added offset.

A little walkthrough is coming up shortly.

3 Likes

a lot of study here, i will dive soon :heart_eyes:

Walkthrough

Here are all the steps, consolidated into a few sped-up videos.

The Rig

In this case, the cloth is driven by these FK controls. The same would apply to anything more complex, like hierarchies of controls or layers of spline IK controls. At the end of the day, you get translate/rotate values out of Ragdoll, so any cloth driven by that is a possible usecase here.

Assign Markers

Nothing special here. The body is already assigned to, such that we can use it for collisions. If not, it would create a first Marker on the torso control here, that you can tweak retroactively for better collisions.

Edit Shapes

Turn everything into boxes and offset things.

Distance Constraints

We’ve now got 3 rows of markers, with shapes that are offset. They are connected everywhere except along the edge between the rows. If your controls all have the same shape, I found it easiest to create all distance constraints up-front, and edit them together via the Channel Box.

I made a minor mistake in the Assignment step, and missed one of the controls. Hence the gap here. But it’s fine and shouldn’t affect the results too much.

Tuning

Finding the Spring Type attribute is probably the most technically involved step. In this case, I used the group created during assignment along with Ragdoll → Select → Group Members to quickly select all relevant markers. Then I used Maya’s Channel Control to expose the attribute on all Markers.

Summary

This is the best technique that I have discovered so far. If you come up with any alternative, please post here!

The one thing this particular technique would do less well is bend resistance along the horizontal axis. For example, if you increased Pose Stiffness/Rotate Stiffness on the group of all cloth markers, they would try and follow the relative angle between your animation controls. But it would ignore the angle between neighbouring controls, which you would expect if the cloth was stiffer.

Luckily, in this case, and perhaps most cases, stiff cloth isn’t as useful.

To experiment with horizontal stiffness, you can try replacing the Distance Constraint for the Attach Constraint. This gives you control over both Translate and Rotate Stiffness and is identical to the stiffness between markers in general.

Future

Vertex-based cloth is on the roadmap. This will remain real-time and will continue to interact with other rigid bodies. I expect that to be a more proper way to do cloth; one where you can retarget each vertex to a given control. It would enable a much higher level of control and easier editing of the topology (because it would be regular polygons).

In this case, since Markers and Distance Constraints have different attributes for stiffness, to edit the overall stiffness one would need to select one of these at a time and edit them individually. In the scene file above, I’ve made that circular control to consolidate the stiffness attributes, as a workaround.

Enjoy and hope it helps!

3 Likes

i’m not really into vertex simulation, my job as a freelancer is to made less or more optimized characters for indie games or for marketplace, vertex is more for serious people or studios, not me. When i made a character i can publish it right away without a problem, since i usually work alone or in coop with brother. the final destination is Unreal Engine and Chaos cloth if needed vertex simulation. In my head i see many things that i can do with your software and my already published characters waiting for that =D. Thank’s one more time for your time, cheers)

Understood, and this applies!

The idea is to simulate vertices but still record onto controls. In the above case, I’d select the polygonal surface, and retarget the same surface to each control. The controls would then receive the same motion they are currently getting - except now you can select a single mesh which has got all relevant attributes.

Your mesh can even have a different topology than your controls; for example, you may want simulation that is a little more dense, but still only record onto a smaller number of controls.

It’ll be able to also output the simulated vertices, but the primary usecase - as Ragdoll in general - are those Translate and Rotate channels or normal animation controls.

2 Likes

Sounds great and i was thinking about same, BUT the tools that you already have in Ragdoll Dynamics already enough for indie like myself) just need spend some time to learn how to use it