The dust has settled, naps have been taken, and the awards have been awarded. Here is my post mortem. Please note, the conclusions I draw here might be still misguided or wrong. If you think so, I would love to hear your feedback. (Sorry for writing so much, I just started typing and it all flew out!)
Things I had to learn the hard way, divided into sections:
Game Engine + Ragdoll workflow
Looking for a nice environment that is optimized with colliders? If you are like me then you would be pretty excited about finally putting all those humble bundle / asset store bundle game assets you keep buying on sale to use with Ragdoll. Here are my tips for pulling assets from Unity, if you don’t care about the interop with game engines, skip this!
Export colliders from Unity
-Ideally you could just export all colliders from engine (just the colliders! If there is a box collider on a model, export a simple box geometry, not the model. Keep your animation scene light!). However after some investigating, this would require writing a custom script (I hope to do this soon). Here is my simpler solution of just exporting every mesh with a collider on it (and having more detailed physics sims in Ragdoll, perhaps this is what you want anyway?):
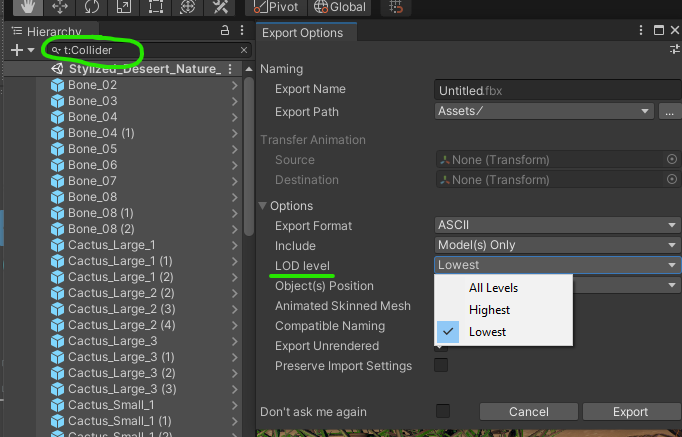
-put “t:Collider” in hierarchy search bar to filter for all gameobjects that have a collider. Select all and fbx export!
-If you had LODs, keep that in mind when exporting and be sure to only export the versions you need!
-Be mindful that Ragdoll will add some thickness to the bottom side of your planes, so if you for example have a ground plane that is facing the wrong way, ragdoll will by default in turn make the ground height change!
Record animation with Unity recorder
-Use Unity Recorder to record animation of character walking down desired path, then drag created anim clip onto character and use FBX Exporter with “animation and model” export setting. The animation that you get from this is a great starting point for Ragdoll as it is is already doing a lot of what Ragdolls locomotion system would be doing.
This is especially important if you are wanting to have a character rig in FK, running in place, and then animated down a motion path as I did here. It makes it so the motion path is a consistent offset from the ground and the foot plants can be more reliably made. Kind of a niche suggestion, but I personally wish I figured this out earlier as I did not do this! (Alternatively, in Maya you could combine all colliders, make selection live, then draw curve on live surface. This may work for smaller environments, but being able to use a gamepad to record the correct path of action in engine is much easier to iterate with)
Ragdoll + Scale
Don’t scale rigs in Ragdoll, instead scale the environment! Things seem like they are fine, until you realize some of the constraints will be wonked. If, like me, you are wanting to get your animation back into a game engine correctly, it is currently much easier to change the import scale of your character rig and animation in engine or to change the scale of the animation in Maya after Ragdoll has been recorded. Hopefully this gets an update or a workaround soon! This also would likely not have been an issue if this was a real production as all the assets would have probably been correct at uniform scale.
Ragdoll + Maya 2022.0 (DON’T)
Perhaps this issue was only in Maya 2022.0, but it is better to have all characters setup in the same file rather than referencing into a scene and then “linking solvers”. In 2022.0, everytime the scene is reloaded the solvers need to be re-linked. It is perhaps also better for figuring out the solver settings in one scene. Replacing or removing references also causes crashes. Perhaps this is specific to 2022.0, but I haven’t had enough time to figure out if it is stable in other versions.I hope to discover a workflow that reliably works where the ragdolls are created in the rig scene and linking works as expected (As I say, perhaps this already works and I just spent a month using the dumpter fire version of Maya). Pro-tip, don’t use Maya 2022.0! Switching Maya versions and getting all my environment setup correctly in the middle of the competition was a huge waste of time.
Advanced Skeleton (or similar) + Ragdoll
EDIT: I just discovered the retargeting feature which addresses this issue. Disregard this section.
How do we record to joints, then trace to controls? I didn’t quite figure this out in time, but I recall in a livestream Jason suggested applying markers to the deformation system of a rig so it will be able to follow all the motion system rig elements, like IK AND FK. This works great until it is time to record the animation. When the animation gets recorded, you will now have baked keys on your deformation system, not on your motion system. There is a final step needed where the animation on the deformation system joints gets “traced to controls” of the motion system. I am currently unaware of exactly how to do this without writing a tool for it. Perhaps the motion capture matcher tool in Advanced Skeleton could do this (although this would first require successfully recording animation to deformation system, which for me broke everything)?
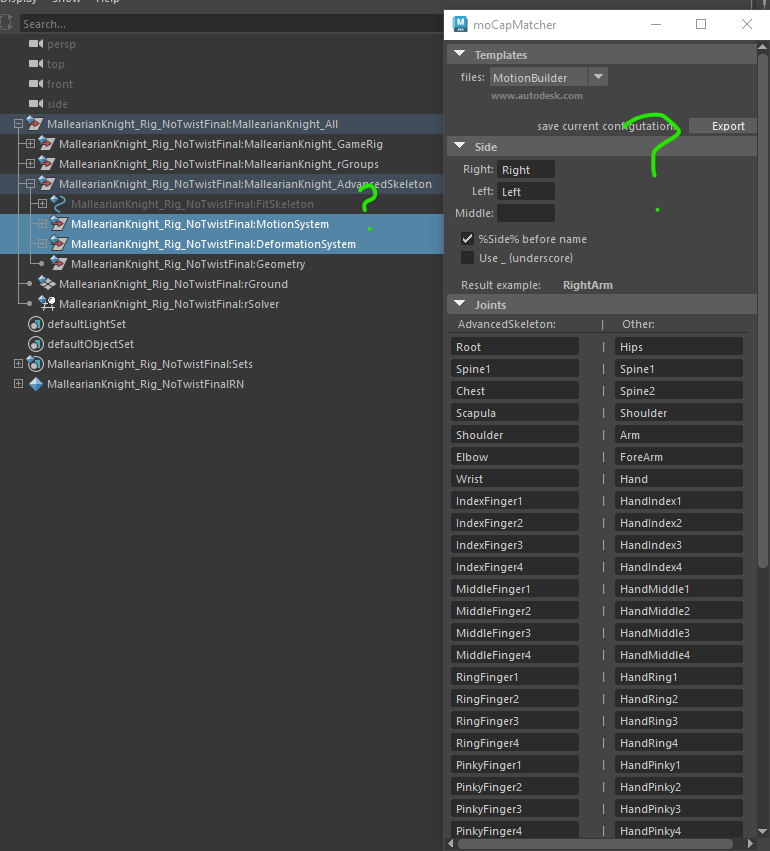
I have still not solved this issue!!! I hope we can get an official tutorial or live-stream covering this issue as the concept of wanting Ragdoll markers on deformation joints that are driven by an animation rig, and then recording that animation onto the control rig instead of the deformation joints seems pretty universal! Perhaps this still isn’t “solved” as it looks like in the Woody Agora Ragdoll tutorial the markers are applied to the FK system and there is an extra step if using IK of caching the solver before switching to FK and recording.
It would be great to have some way to “record animation” in Ragdoll to controls. In the short term it would be great if we could record the animation to a temp set of locators and then manually copy that animation to our control rig.
Long Tentacles + Ragdoll
If you are hoping that you can just get a couple poses on some long tentacles and then Ragdoll will perform the magic of making it look alive and amazing - handling all collisions, using pins wherever you want on the tentacles to have the ease of animating in IK but also keeping your animation from looking “ik” - I’m sorry. As Marcus said, it may be possible with a series of pins down each tentacle, or by skipping every few joints so there is a simplified ragdoll rig for the tentacles (but this requires additional work of orient constraining the skipped tentacle joints ), the tool is not designed to solve this problem and you will be fighting against the grain to get this to work. If you do dare to try this, don’t forget to lock the translate values!!! I did not do that in time and so my recorded animation was unusable. Getting Ragdoll to work correctly with long tentacles is likely a much for time intensive task than you would expect and I would therefore advise against it. For this competition I would have gotten much further along by simply hand keying the tentacles. You live, you learn. Maybe one day when I become a Ragdoll expert I will return to solving this problem, but for now I have little interest.
Locomotion
At sensible scales, this thing is a miracle worker. I, however, found many issues with getting this to work as intended for my monster character, who was rigged at an absurdly large scale. No matter the amount of fiddling with the limits on the legs, I couldn’t get the step height to be anything that looked correct (the feet looked to be sliding on the ground, there was nowhere near the correct step height.) I so badly just wanted to tweak a “step height” setting to fix this, but alas the system is not designed to work that way.
There is an issue with the body being put underneath the ground on the start and end frames. Perhaps this has something to do with the joint hierarchy have a root joint that wasn’t part of ragdoll, I don’t know. This seems to be a bug relating to the body not being the root of its hierarchy / being a child of some other element. Try as much as you want to play with the limit settings and anything else in the rPlan, but you will not find a solution here. The working solution I found for this is to create some temp rig with locators/geometry/whatever (don’t freeze transforms!), apply the plan to this, then constrain your pins to your temp rig.
Pose space = World
Something I found myself doing more than once was baking locators on selected source animation, then copying that anim to pins. Perhaps the better way to get your source animation faithfully into Ragdoll is to instead set the marker’s pose space to “world”, perhaps increasing pose stiffness and decreasing damping, and not bothering with pins at all (for example, with the crab body here). You can now use anim layers to do the animation edits that would have been done on the pins.
With using pins I found it frustrating that when I needed to export my animation to a new scene due to technical issues that my animation was spread across both the source keyframe animation and the pins (also it kind of stinks that the source animation is no longer representative of the ragdoll goal. Pins are a fantastic feature, but because of this, perhaps its best to only use when strictly necessary?). I then needed to snap my source animation to the pins, and then export that animation. I could have recorded the animation of just the pinned object (the crab body in this example), but I am worried about doing too much recording and then feeding that back into the ragdoll system as I expect it will muddy up the sim, and I wasn’t ready to record and keep as kinematic.
Other mistakes I made along the way:
Replace Mesh
Not using replace mesh and instead trying to invent a workaround for the saddle collision mesh. At first I made a collision mesh version of the saddle, skinned it to the saddle joint so it would follow the rig when posing and setting up the sim, and then welded it to the saddle joint so it would follow the saddle joint during the sim. What a waste of time when we have the replace mesh feature! I simply didn’t know about that feature and wasted time trying to find a workaround. Don’t sleep on this feature!
Assign Environment
Did not use “Assign Environment” feature. Looking back I had no idea why I didn’t. I believe I had just faced some weird crashing, likely due to Maya 2022.0, so just wanted to build my own super simple collision geo to avoid further issues. Don’t make my mistake, I can see now this thing works, use it!
A Rather Impractical Idea

Just look at the chains rig I made on this crab. Again this is a long chain which isn’t a great idea(EDIT, long lifeless chains like rope seem to work great)but also the placement of the chain was between a bunch of moving legs. It was just too tight of an area to expect Ragdoll to do anything of value here. As soon as the chains were turned on, the rig exploded. Translate motion = soft? Still exploding. I figured that after I was done with the crab I could put the rig into kinematic and then bake the chains sim, but I didn’t have time and I still doubt it would have worked as desired given that the legs were already colliding with each other. Perhaps there is a way to get Ragdoll to work in entirely impractical spaces but I lost hope trying to find it.
Things I learned the easy way:
Ragdoll is an awesome, game-changing tool. I look forward to using it for many years to come.
Summary
I came into this competition wanting to throw a bunch of challenges at Ragdoll at see where it succeed and where it failed. If I wanted a better chance at winning or at least getting to a more polished final piece, it would have been smarter to have spent some time testing Ragdoll to find out what it does best and then leaned into that.
I am lucky that I was able to convince my work to buy me a couple licenses to Ragdoll (I only asked for one but they loved the idea of it so much we bought two), so I get to continue to use Ragdoll professionally, but now I also get to use my prize personal license in my free time on my personal machine. I hope to one day either win or purchase a commercial license to use in my personal projects.
I still have much to learn and master, and I look forward to the journey.
Thanks again to the Ragdoll team for putting on this competition and to all the competitors for showing up!
~Cody